

MySQL版本: 8.0.43
操作系统: Ubuntu24.04
城市: 广州(第一台),南京(第二台、第三台)
Ubuntu安装MySQL
sudo apt update
sudo apt install mysql-server

mysql --version
sudo systemctl start mysql #安装后应该是已经启动的,如果没有启动则启动

sudo mysql #通过无密码连接,必须sudo
大坑:公网之间配置虚拟网卡--WireGuard
之前写了一篇Docker配置多从,在局域网里所以直接就成功了,公网需要做这一步。
填节点的公网IP会报错:
 #/var/log/mysql/error.log

[Repl] Plugin group_replication reported: '[GCS] There is no local IP address matching the one configured for the local node (node1.wjhblog.cn:33061).'
换成域名或公网IP都会报错,意思就是在本机网卡列表中没有找到这个公网IP,而云服务器大多是EIP/NAT,公网IP是映射的,真实公网IP不在网卡上,所以要用虚拟网卡。
每台服务器安装并生成密钥:
sudo apt update
sudo apt install -y wireguard

#生成公钥和私钥对
wg genkey | tee privatekey | wg pubkey > publickey
会生成二个文件,privatekey、publickey。记录下每一台的公钥和私钥。
假设情况:
node1:/etc/wireguard/wg0.conf
[Interface]
PrivateKey = private_1
Address = 10.88.0.11/24
ListenPort = 51820

[Peer]
PublicKey = public_2
AllowedIPs = 10.88.0.12/32
Endpoint = 2.2.2.2:51820
PersistentKeepalive = 25

[Peer]
PublicKey = public_3
AllowedIPs = 10.88.0.13/32
Endpoint = 3.3.3.3:51820
PersistentKeepalive = 25
node2: /etc/wireguard/wg0.conf
[Interface]
PrivateKey = private_2
Address = 10.88.0.12/24
ListenPort = 51820

[Peer]
PublicKey = public_1
AllowedIPs = 10.88.0.11/32
Endpoint = 1.1.1.1:51820
PersistentKeepalive = 25

[Peer]
PublicKey = public_3
AllowedIPs = 10.88.0.13/32
Endpoint = 3.3.3.3:51820
PersistentKeepalive = 25
node3: /etc/wireguard/wg0.conf
[Interface]
PrivateKey = private_3
Address = 10.88.0.13/24
ListenPort = 51820

[Peer]
PublicKey = public_1
AllowedIPs = 10.88.0.11/32
Endpoint = 1.1.1.1:51820
PersistentKeepalive = 25

[Peer]
PublicKey = public_2
AllowedIPs = 10.88.0.12/32
Endpoint = 2.2.2.2:51820
PersistentKeepalive = 25
sudo wg-quick up wg0 #应用配置并增加一个虚拟网卡
#sudo wg-quicl down wg0 #如果配置错了,用这个命令取消当前的虚拟网卡,
sudo systemctl enable wg-quick@wg0
sudo wg show
ping 10.88.0.12
ping 10.88.0.13ip a
#虚拟网卡信息:
#3: wg0: <POINTOPOINT,NOARP,UP,LOWER_UP> mtu 1420 qdisc noqueue state UNKNOWN group default qlen 1000
# link/none
# inet 10.88.0.11/24 scope global wg0
# valid_lft forever preferred_lft forever配置MySQL
/etc/mysql/mysql.conf.d/mysqld.cnf:
[mysqld]
server_id = 102
report_host = 10.88.0.12
report_port = 3306

log_bin = mysql-bin
binlog_format = ROW
enforce_gtid_consistency = ON
gtid_mode = ON
binlog_row_image = FULL
log_slave_updates = ON

transaction_write_set_extraction = XXHASH64

plugin_load_add = group_replication.so
loose-group_replication_bootstrap_group = OFF
group_replication_group_name = "3b2d2e3a-9f6c-11ee-8c3d-0242ac120002"

group_replication_local_address = "10.88.0.12:33061"

group_replication_group_seeds = "10.88.0.11:33061,10.88.0.12:33061,10.88.0.13:33061"

group_replication_single_primary_mode = OFF
group_replication_enforce_update_everywhere_checks = ON
group_replication_consistency = BEFORE_AND_AFTER
group_replication_start_on_boot = OFF
group_replication_member_expel_timeout = 20
group_replication_group_name和group_replication_group_seeds每台相同
修改:server_id、report_host(每台自身局域网IP)、group_replication_local_address(所有节点IP)
IP注意用wireguard配置的虚拟局域网IP!
每一台都先配置好,再全部重启MYSQL!
sudo systemctl restart mysql #重启MYSQLnode1执行-引导节点bootstrap
mysql_native_password在8.0.43是支持的,默认是用caching_sha2_password插件,必须要用SSL,不支持不安全的连接(如果配置了SSL就不用管这个第三行)。如果8.4.*不支持mysql_native_password的话,在安装的时候应该会有一个选项,选择兼容5.x
CREATE USER repl@'%' IDENTIFIED BY 'StrongPass!';
GRANT REPLICATION SLAVE, REPLICATION CLIENT ON *.* TO repl@'%';
ALTER USER 'repl'@'%' IDENTIFIED WITH mysql_native_password BY 'StrongPass!';
FLUSH PRIVILEGES;
SET GLOBAL group_replication_bootstrap_group=ON; #第一台必须要bootstrap
START GROUP_REPLICATION;
SET GLOBAL group_replication_bootstrap_group=OFF;
SELECT * FROM performance_schema.replication_group_members;node2、node3等其它节点
repl和StrongPass!是node1添加的MYSQL账号,需相同
CHANGE MASTER TO MASTER_USER='repl', MASTER_PASSWORD='StrongPass!'
  FOR CHANNEL 'group_replication_recovery';
START GROUP_REPLICATION;

SELECT * FROM performance_schema.replication_group_members;
三个节点都START后都为ONLINE就是正常
MYSQL关闭或重启后恢复工作
第一台node1引导节点:
SET GLOBAL group_replication_bootstrap_group=ON;
START GROUP_REPLICATION;
SET GLOBAL group_replication_bootstrap_group=OFF;
其它主节点:
START GROUP_REPLICATION;测试同时改数据
以下是在二台不同服务器上运行一个会在同一时刻执行的程序。
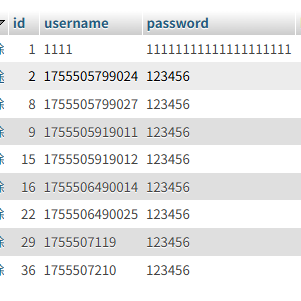
同时插入行:没有问题,ID会根据自增偏移跳着走,第一台添加第一次是1,第二台添加第一次可能是8
向unique字段添加相同的二行:只有一个会成功,其它的报错Error 3101 (40000): Plugin instructed the server to rollback the current transaction
不加锁修改decimal:
同时: 只有一个会成功,其它的报错Error 3101 (40000): Plugin instructed the server to rollback the current transaction.
时间间隔0.5秒: 都成功